TIPS FOR GERMINATION AND CUTTINGS
In indoor culture, the challenge is to manage to recreate the essential conditions for the good germination or cutting of the plant. Besides the technique, there is also the equipment, greenhouses, heating tablecloth, substrates for cuttings, fertilizers for cuttings... There are 2 techniques for to make push plants :
- The cutting
- The germination
1. The germination
Secondly, what is germination?
The phase of germination of a plant starts with the exit of the first root and finishes at the time of the formation of the second stage of leaves of the seedling. The plant enters then in vegetative phase.


The various methods of germination of a seed are not very complex and require little attention, considering the sometimes dazzling result. Indeed, the simple fact of placing the seed during 24 to 48 hours in the vegetable tray of the refrigerator makes it possible to simulate a winter environment (it is also an excellent means of preserving the seeds at a stable temperature, in a box of film for example).
Then, for the germination, it is necessary to recreate conditions spring, wet and hot (around 70% of hygrometry and 27°C). The evolution of the first root will be all the more lively if you simulate the seasons.
*TO KNOW: The ideal pH of water for germination is of 5,8 - technique of the germinated seed glass.
Three methods of germination
Technique of the two plates:
Take a plate and place a double layer of absorbent paper (cotton being too stringy) moistened with water at pH 5.8 on it. Place the seed and cover it with another double layer of paper, moisten again. Cover the whole with a plate.
Glass technique:
Place the seed in a glass of pH 5.8 water and take it out immediately when it sinks, to prevent the seed from rotting after opening. You should see the first root of the germinated plant.

Direct germination in the substrate:
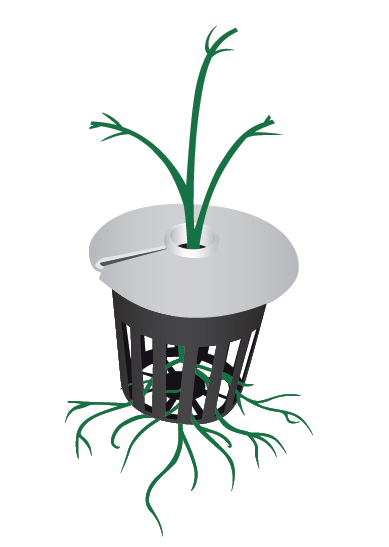
- In soil, place the seed in a small plastic pot (7 x 7 cm or smaller) about half a centimeter from the surface, sprinkle with soil, pack without crushing, and spray morning and evening until the first two leaves (cotyledons) appear. Then water as soon as necessary, only after the appearance of the leaves in order to avoid the asphyxiation or the displacement of the seed at the bottom of the pot.
- In rockwool, decontaminate the block in water with a pH of 5.5 for 24 hours then place the seed in the block. Spray the cube morning and evening with pH 5.8 water to moisten it (without wetting it!) until the first leaves appear. Once the block is filled with roots, repot the plant without delay (the roots being photosensitive) in the selected substrate, without removing the rockwool.
In all the cases, the ideal to carry out a germination successfully is to be equipped with a greenhouse or another system (reusable within the framework of the cutting) in order to guarantee to your seedlings an optimal hygrometry and temperature. This is why the ventilations of greenhouse must be closed during the first days of the germination, then opened gradually the following days, the seedlings being very sensitive to the abrupt climatic changes.
You can also stimulate the first roots (germination phase) with root stimulators . Once your plant is in the growth phase, you can add growth fertilizer.
Be careful! Do not forget to make water drainage holes at the bottom of the pot so that the water drains away. This way you will avoid soil flies or rotting of your roots.
2. Cutting or cloning
First of all, what is cutting?
The principle of cutting is to create, from the stem of a plant, another plant of the same genetic code, thus with the same characteristics (structure, production and taste) as the initial plant, called mother plant. In other words, the cutting is a mode of vegetative multiplication of certain plants consisting in giving birth to a new individual (individual child of the mother plant) starting from an organ or a fragment of isolated organ (piece of branch, leaf, root, stem, scale of bulb). This technique is a form of cloning: the cutting is genetically identical to the mother plant. The cutting is made by cellular dedifferentiation at the meristem level.
How to make a success of your first cutting ?
As an indoor gardener, this technique will allow you not to have bad surprises since your next cuttings will come from your favorite plant. The cutting or cloning of a plant requires attention and some essential accessories to make a success of its first cutting(greenhouse, scalpel or sterilized cutter, aeroponic cuttings , hormones for cuttings...)
Aeroponics cuttings
- Prepare a glass of water pH 5,8
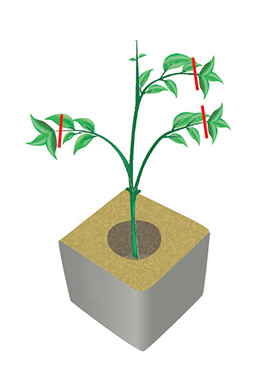
- Take the cuttings cut in a bevel of 8 to 12 cm length and immerse them directly in the glass.
- Remove all the leaves from the stem except for the top ones which should be cut in half to avoid too much water absorption.
- Rinse the clay balls in a pH 5.5 water and prepare the cutting system, clean and filled with water always at the same pH.
- Change the water of the system every 5 to 7 days
- When small white spots appear on the stem (the future roots!), add a root stimulator to the watering.
- After having obtained a suitable root system, transplant the cutting in the selected substrate with the basket.
- Knowing that a beginner will succeed in 50% of his cuttings (90 in aeroponic system), allow a margin of error in order to obtain the desired number. Get your first roots in 5 days!
- The propagation systems like the Super Cloner allow from cuttings and seeds, to obtain young vigorous and perfectly rooted plants, having an excellent faculty of adaptation to the environments in which they will be transplanted.
Cuttings most common method in soil/inert substrate
| Illustrations | Cutting steps |
|---|---|
 |
Easy removal with a scalpel1. Prepare a glass of water pH 5.5. Locate the cuttings of the plant: straight branches with a length of 8 to 12 cm and a stem that is neither too thin nor too wide, so that it can stand straight. This will ensure that it does not expend too much energy to keep its external structure alive. Using a scalpel or a sterilized cutter, bevel the chosen stem (preferably below a knot). |
 |
2. Immediately place it in the glass of water, to prevent any risk of infiltration of an air bubble in the cutting which would be fatal (embolism). |
 |
3. Once the cuttings have been taken, separate all the leaves from the stem except those at the top (2/3 leaves), which should be cut in half (so that the cutting sweats as little as possible). Let the stems rest in the dark for 6 to 12 hours (this step should not be done for aeroponics cuttings). Activate with cuttings hormone To increase your chances of success with your cuttings, fill a small container with cutting hormones (not directly in thecutting hormones bottle to avoid bacterial proliferation from one cutting to another) and apply the hormones on 1 to 2 cm at the bottom of the stem. Shorten the stem by half a centimeter (also in bevel). |
 |
4. Place the cuttings in the selected substrate (rockwool or earth) well moistened, then enclose the whole in a greenhouse, closed vents (ideal temperature 18-23°C). The cuttings must receive light 18 hours a day. A compact fluorescent or neon lamp placed at least 40 cm away is ideal. Spray morning and evening the greenhouse cover, the substrate and the cuttings with water pH 5,8 to 6. |
 |
5. Be careful not to leave any puddles of water in the greenhouse tray to avoid any mould. After 5 to 6 days, start to open the vents of the greenhouse: half a vent every day. To accelerate rooting, add a root stimulator to the water (always pH 5.8 to 6) and spray. Once the vents are fully open, half-open the greenhouse hood, ventilate gradually and continue spraying. The next day, remove the cover and water if necessary (without spraying to avoid the "magnifying glass" effect, always with the same solution. |
 |
The cutting has taken if, after 3 to 4 weeks, you can see new shoots at the eyes. Once the substrate is filled with roots (filledearthen pots or rockwool leaving a glimpse of the roots), transplant into the chosen culture substrate (clay balls, earth, rockwool). Never leave the terminal bud of the branch so that, at the time of the start of vegetation, it is the formation of the roots which is privileged and not that of the stem. Prune each branch as soon as the third bud appears. |
Transplant the cutting
Cutting in the ground
- With a stick, dig a hole 5 cm deep.
- Plant the cut side of the cutting in the ground.
Rockwool cuttings
It is recommended to decontaminate the blocks in pH 5.5 water for 24 hours before starting the first stages of the cutting.
Our products for Cuttings.
Find all our advices for your indoor culture :
- Tips for indoor growing : Light
- Advice for indoor growing : Air
- Advice for indoor growing : The Substrate
- Growing tips for indoor plants : Water and fertilizers
- Growing tips for indoor plants : Germination and Cutting
- Growing tips for indoor plants : Growth
- Growing tips for indoor plants : Flowering
- Growing tips for indoor plants : The growing room
- Tips for indoor growing : Systems
- Growing tips for indoor plants : Water control
- Growing tips for indoor plants : Aquaponics
- Growing tips for indoor plants : Accessories